Getting started

This guide explains notable aspects of starting a Core Keeper playthrough. It highlights significant menu options, then walks through the initial game progression and lists many quality of life tips that are not obvious.
Worlds, characters and multiplayer[edit]
World and character saves are stored independently of each other, in different save files. So characters can visit multiple worlds at any time, locally or remotely hosted.
Multiplayer is natively supported, without needing a dedicated server. More than the officially stated 8 players can connect to a world at the same time.
Boss health and their characteristics are scaled up, in multiplayer, by the number of players connected to a world. The amount of extra health bosses gain, per player, diminishes witch each additional player. Enemy health is not scaled, but more of them will appear over time, because they are spawned around each player.
World Creation[edit]

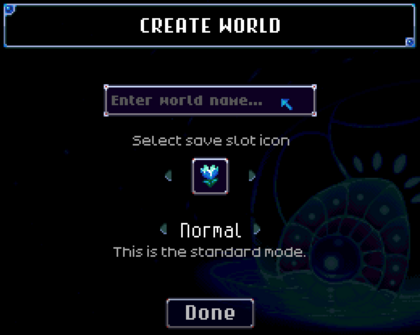
To play in your own world, select Start Game from the main menu. This opens the Select World menu. Picking an empty slot leads to the Create World screen.
To play in a friend's world, instead, select the Join Game option from the main menu, to enter the game ID. Or use the Steam friends list to join a specific contact already in game.
After creating a world, the name, icon and difficulty can not be modified from within the game. However, they can be changed using third party apps or by manually editing some plain text in specific save files.
Worlds are either Normal or Hard difficulty. In hard mode worlds, all enemies and bosses have their base health and damage doubled. This makes the game substantially more challenging: many later game mobs can one-shot players and optimal strategies are often required, utilising all aspects of gameplay.
The only advantage of hard mode is 50% more loot slots in chests from defeated bosses. There are no unique hard mode items.
Worlds can be deleted via: Main Menu -> Settings -> Delete progress options -> Delete worlds menu -> [select slot].
Character Creation[edit]
Next, players select a character save slot and then a character type:
| Character type | Upon death |
|---|---|
| Normal | Drops main inventory contents into a gravestone and respawns at The Core or their Bed. As intended. |
| Hardcore | Drops entire inventory and character save file is deleted. There is no advantage to this challenge mode. |

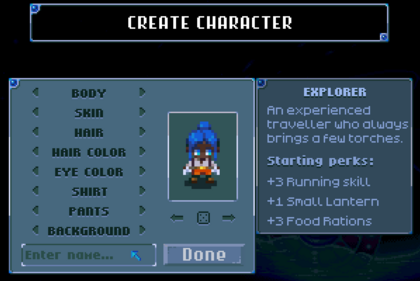
The Create Character screen then takes input for a name and various aesthetic choices and character. Again, none of these settings can be changed from within the game, without mods. But character files can be deleted via the Delete progress options in Settings.
Background picks between a few different starting load-outs and item perks. The amount of skill points awarded are somewhat negligible and the items are all easily obtainable within the first hour of play. So this will not affect the game in the medium to long term; there are no true character classes.
Specialisation between players is limited to variation in accumulated skill points, awarded for doing each of the 9 activity types. This gives improved base stats for those activities and access to reconfigurable talent perks in the skill trees.
| Background | Skill points | Items |
|---|---|---|
| Explorer | +3 Running | |
| Miner | +3 Mining | |
| Fighter | +3 Melee | |
| Chef | +3 Cooking | |
| Gardener | +3 Gardening | |
| Fisherman | +3 Fishing | |
| Nomad | None | None |
Early game crafting[edit]
You start the game in front of an ancient machine called the Core. You have to power it up by activating the 3 effigies next to it. There are 3 bosses in the starting areas that will drop 3 items needed to activate them.
Tier 0: Wood[edit]

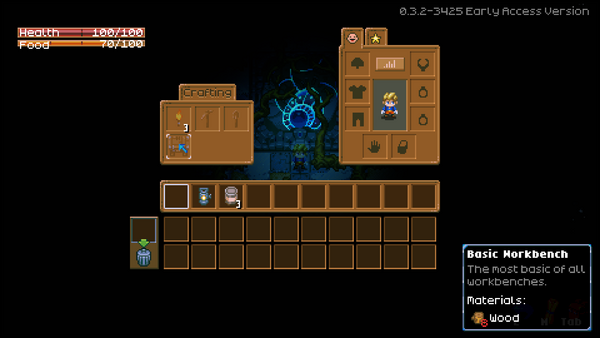
Destroy the roots surrounding the Core to collect them. You can use ![]() Wood to craft several basic tools. Press Tab to open your inventory and status menu. From there, you can craft 4 items:
Wood to craft several basic tools. Press Tab to open your inventory and status menu. From there, you can craft 4 items:
 Torch: The world of underground is mostly dark, you will be required to use many sources of light, such as torches, to explore. Torch can be held and placed on the ground. Use them to illuminate the area.
 Wood Pickaxe: Pickaxes are required to mine walls efficiently. In this game, you are allowed to go anywhere you want without following a set direction, but most of these paths are blocked by increasingly stronger walls. By upgrading your pickaxe you will open up places where you previously can't explore.
 Wood Shovel: Shovels are used to destroy and obtain grounds, leaving a hole behind. Grounds can be placed to fill in holes and lakes, shaping the land or bridging a gap.
 Basic Workbench: Workbenches are your primary crafting stations, granting access to new and upgraded equipment, processing stations, and useful building components.
Craft those items by clicking on them. Place the workbench on the ground and then interact with it to open up the crafting and inventory menu. These new tools are your next target to craft. In general here's how the upgrade loop works:
- Craft a workbench, and use the workbench to create stronger tools
- Use stronger tools to mine tougher walls for stronger resources
- Use stronger resources to craft a stronger workbench, and repeat
Tier 1: Copper ores[edit]
Use your Wood Pickaxe to destroy the walls of the Dirt Biome, exploring and expanding your territory. Glittering sparkles within the darkness will show you where to go: a column of rising glitter leads you to an open room with a lake or a growing plant, while larger, more static sparkles show valuable minerals like ![]() Copper Ore buried in the walls. Collect Copper Ore as you find it, process it into
Copper Ore buried in the walls. Collect Copper Ore as you find it, process it into ![]() Copper Bar using the
Copper Bar using the ![]() Furnace, and craft your first metal tools at the
Furnace, and craft your first metal tools at the ![]() Basic Workbench.
Basic Workbench.
Tier 2: Tin ores[edit]
Once you obtain copper tools, you should head out to The Clay Caves, where you can obtain ![]() Tin Ore. If you head out in one direction from the Core, you will encounter a chasm surrounding the Dirt Biome, which you can easily cross using
Tin Ore. If you head out in one direction from the Core, you will encounter a chasm surrounding the Dirt Biome, which you can easily cross using ![]() Wood Bridge from the Basic Workbench. On the far side of the chasm lies either The Clay Caves, your correct destination, or The Forgotten Ruins, where the gray stone walls are hard to break with your weak copper pickaxe. The Clay Caves and The Forgotten Ruins both occupy one half of the world beyond the circular chasm; if you find the Forgotten Ruins first, travel in the opposite direction from the Core to find the Clay Caves.
Wood Bridge from the Basic Workbench. On the far side of the chasm lies either The Clay Caves, your correct destination, or The Forgotten Ruins, where the gray stone walls are hard to break with your weak copper pickaxe. The Clay Caves and The Forgotten Ruins both occupy one half of the world beyond the circular chasm; if you find the Forgotten Ruins first, travel in the opposite direction from the Core to find the Clay Caves.
Once you reach the Clay Caves, mine for enough tin ores to craft ![]() Tin Workbench and their tin tools and equipment.
Tin Workbench and their tin tools and equipment.
Tier 3: Iron ores[edit]
Now head to The Forgotten Ruins. If you didn't find it earlier, you can either head back to the Core and mine in the opposite direction, or go "sideways" through the Clay Caves, traveling in a large circle around the Core.
You may occasionally obtain ![]() Gold Ore while mining the previous tier, since you can obtain them on the clay caves and the forgotten ruins. Tier 3 is where you can finally use them, along with
Gold Ore while mining the previous tier, since you can obtain them on the clay caves and the forgotten ruins. Tier 3 is where you can finally use them, along with ![]() Iron Ore. Once you have enough gold and iron ores, craft all available tools and equipment from
Iron Ore. Once you have enough gold and iron ores, craft all available tools and equipment from ![]() Iron Workbench.
Iron Workbench.
There is no higher tier you can reach before you defeat the 3 bosses. So this is the time to kill whichever bosses you haven't killed yet.
Early game bosses[edit]
Boss 1: Glurch[edit]
Recommended gears: Tin equipment or higher
Glurch spawns in the Dirt Biome. Approximately 65 tiles from the Core, in a random angle. When you get close, your screen will shake periodically.
Check Glurch the Abominous Mass page for strategy. Glurch will drop ![]() Glurch Eye when defeated, one of the three items required to power up the Core. Go back to the Core and place the eye on Glurch's effigy. Once activated, you can interact with it as a workbench, opening up more crafting recipes.
Glurch Eye when defeated, one of the three items required to power up the Core. Go back to the Core and place the eye on Glurch's effigy. Once activated, you can interact with it as a workbench, opening up more crafting recipes.
Boss 2: Ghorm[edit]
Recommended gears: Iron equipment
Ghorm spawns approximately 250 tiles away from the Core. Unlike other bosses, Ghorm is constantly moving, circling the Core, moving between the clay caves and the forgotten ruins, destroying everything in its path. Since it's always circling the Core, it doesn't matter which direction you go, you will always end up reach Ghorm's track. The track is approximately 8 tiles wide, filled with ground slimes.
Check Ghorm the Devourer page for strategy. Ghorm will drop ![]() Ghorm's Horn when defeated, one of the three items required to power up the Core. Go back to the Core and place the horn on Ghorm's effigy. Once activated, you can interact with it as a workbench, opening up more crafting recipes.
Ghorm's Horn when defeated, one of the three items required to power up the Core. Go back to the Core and place the horn on Ghorm's effigy. Once activated, you can interact with it as a workbench, opening up more crafting recipes.
Boss 3: The Hive Mother[edit]
Recommended gears: Iron equipment
The Hive Mother spawns in Larva Hive Biome, a sub-biome of The Clay Caves, approximately 330 tiles away from the Core. But you can use ![]() Hive Mother Scanner to locate its position on the map. The scanner can be crafted by interacting with Glurch's effigy, once you have activated it.
Hive Mother Scanner to locate its position on the map. The scanner can be crafted by interacting with Glurch's effigy, once you have activated it.
Check The Hive Mother page for strategy. The Hive Mother will drop ![]() Heart of the Hive Mother when defeated, one of the three items required to power up the Core. Go back to the Core and place the heart on the Hive Mother's effigy. Once activated, you can interact with it as a workbench, opening up more crafting recipes.
Heart of the Hive Mother when defeated, one of the three items required to power up the Core. Go back to the Core and place the heart on the Hive Mother's effigy. Once activated, you can interact with it as a workbench, opening up more crafting recipes.
Powering up the Core[edit]
Once you have activated all three Boss Statue effigies, the Core will power up, and your journey to the infinite world of the underground will begin. The Core will give you a hint on where to go next.
Useful commands[edit]
- Save files backup: Press Ctrl+Alt+B on title screen to backup your save files to desktop
- Automatic torch: Hold Shift to equip torch
- Place all matching items to a chest: Press Q while opening a chest to place all matching items on that chest from your inventory
- Sort inventory: Press R while opening inventory
- Quick item transfer: Press Shift+Left Click to transfer selected item from inventory to any opened window like equipment, chest, shop
- Pick 1 item from a stack: Press Alt+Right Click on selected item
- Pick 10 items from a stack: Press Ctrl+Right Click on selected item
- Pick half stack: Press Shift+Right Click on selected item
Tips[edit]
- You can't directly speed up ore smelting time, but you can craft several furnaces or smelting kilns to process ores concurrently.
- Before fighting a boss, place a bed some distance away and sleep on it for a few second. This will change your home point to that bed. In case you die, you will respawn there.
- You can repair your tools and equipment with
 Salvage and Repair Station by using
  Scrap Parts. Craft and then salvage low tier equipment, e.g. made with wood, to get cheap source of scrap parts.
 - You can't die of hunger, it will only reduce your max health and stats.
- To get merchant NPCs to come into your base, you have to fulfil the following conditions:
- Create a room between 2x2 and 8x8 tiles, anything smaller or larger will not work
- Place a door and a bed
- Place a specific NPC item such as
 Slime Oil or
  Mysterious Idol
 - No players must be near the room within 30 tiles for at most a minute
